
Background
In November and December of last year, Google rolled out the ability to block time for tasks in your Google Calendar with a duration, visibility controls, and more. While Google Calendar was already a go-to time blocking tool for millions of people, this update makes it even more powerful for time blocking your tasks into your calendar.
In this article, we’ll explore how to use this new time blocking feature to time block your Google Calendar, and we’ll offer tips on how to supercharge your time blocking skills.
Let’s jump in!
What is time blocking?
Time blocking is a time management method where you schedule specific blocks of time for each task or activity throughout your day. Instead of working through an open-ended to-do list, you allocate dedicated time slots for focused work, meetings, breaks, and personal tasks.
This approach helps you prioritize what’s important, stay focused, and avoid multitasking. By structuring your day this way, you can boost productivity and reduce stress, as every minute has a purpose, and you have a clear roadmap for the day ahead.
Why should I use Google Calendar for time blocking?
Google Calendar is one of the best calendars for time blocking available today. Here’s what makes it a great option for time blocking:
- Simplicity: Google Calendar is super easy to pick up and use as a basic calendar, making it simple to block time for your tasks with just a few clicks or taps.
- Color-coding: Events can be color-coded, allowing you to understand your time at a glance.
- Cross-platform: Google Calendar works seamlessly across all devices, whether you’re on your phone, tablet, or computer.
- Reminders: You can set reminders for each time block, so you’ll get notifications when it’s time to switch tasks or prepare for upcoming events, helping you stay on track throughout the day.
How to set up time blocking in Google Calendar
Step 1: List all your tasks
Start by making a comprehensive list of all the tasks you need to complete, including how long you think they’ll take and when you want them completed by. This will help you know what you need to time block. You can make this list in any notetaking app or just on paper, since we’ll just copy it into Google Calendar later.
Tip: When estimating duration, block out more time than you think you need. A good rule of thumb is to schedule 1.5 times the amount of time you think a task will take, to account for any unexpected delays.
If your tasks don’t have a deadline, pick a date that you want to have that task completed by, even if it’s two months away.
Here’s what your to-do list might look like:

2. Prioritize Tasks
Once you have your list, prioritize the tasks based on their importance and deadlines. Identify which tasks are critical and time-sensitive, and which can be scheduled later or require less focus.
This step ensures your most essential tasks get adequate time on your calendar. If you need help prioritizing, try using the Eisenhower Matrix, a productivity method designed to help prioritize tasks.
You can prioritize in any format you find helpful. This can even be as simple as categorizing them into High and Low priority sections.

Step 3: Block Time for Your Tasks
Starting with your higher priority tasks, block time for your tasks by clicking directly on a free spot in the calendar. Alternatively, you can click and drag to select both the start and end date.
Underneath the title, you’ll notice you can select “Event” or “Task”. These have important differences, and how you choose to set up your time blocks impacts whether you should use Tasks or Events, so let’s quickly cover the difference before getting into the different time blocking methods. 👇
Should I use Events or Tasks for Time Blocking Google Calendar?
As of Google Calendar’s recent update, Tasks can now have a duration instead of the default 30 minute duration, so they can now be used for time blocking. However, tasks have some limitations, so you might need to still use Events in some cases.
Tasks can be marked complete, giving a sense of accomplishment and allowing you to keep track of which tasks were completed and which still need to be done. They can also be added to lists to keep your different areas of life organized, and they have a due date field which doesn’t actually do anything but is helpful for reference.
However, tasks in Google Calendar don’t support duration on repeating tasks yet (as of January 2026), so if you need to block time for repeating tasks, you’ll need to use events.
Events do support duration on repeating events, and they also support other event fields like guests, location, and conference calling.
So, use Tasks for non-repeating tasks, and use Events for repeating tasks or when you need to invite other people. Or if you prefer to use just one, using events for all your tasks is currently the safer option.
How Should I Time Block My Days?
There are three main methods to block time in Google Calendar, so we’ll walk through each one and give specific tips for each:
Method 1: Divide Your Day into Large Blocks for Different Types of Tasks
This method is better for simpler time blocking and reducing context-switching.
In this approach, you categorize your tasks into broad types, such as “work”, “meetings”, “focus time”, etc. Then, block out large chunks of your day for each category. For example, you might reserve the morning for focused work tasks, mid-afternoon for meetings, and evenings for personal or family time. This helps you group similar tasks together and maintain a structured routine.

Since repeating Tasks don’t support duration, you’ll need to use Events instead of Tasks for this method.
Method 2: Block Time for Individual Tasks
This method is better for ensuring all your tasks will hit their deadlines, although it takes more effort to maintain.
Using this method, you’ll create a Task or Event for each individual task on your calendar.
To quickly set up the bulk of your calendar, put your repeating tasks in first. Repeating tasks in Google Calendar don’t support duration yet, so you’ll need to select “Event” instead of “Task” for these. Add repeating events for as many things as you can think of that repeat. For example: daily meetings, workouts, personal routines, or other habits. This will help you quickly set up the bulk of your calendar.

Afterward, fill in one-off tasks around these repeating blocks. Optionally, use color-coding to visually differentiate between types of tasks. This makes your calendar more organized and easy to read at a glance.

Method 3: Hybrid approach
For a more balanced approach, try using both large blocks and individual tasks.
Start by creating large time blocks for your focus time. For example, 2 hours per day where you’ll only work on administrative tasks.

Then, schedule individual tasks that have specific deadlines, so you can make sure they’re scheduled before their deadlines.
You can either schedule them around your larger focus blocks, or if they are part of that larger block, you can schedule them during the large block. For example, you might schedule 30 minutes of responding to emails during your 2-hour “Administrative tasks” block.

Step 4: Follow your schedule!
Following through on doing the tasks when you planned to is one of the most difficult parts of time blocking. While the calendar can’t do the work for you, you can use the calendar to help keep you on track.
Make your calendar easy to look at by downloading Google Calendar on all your devices (computer, tablet, phone, etc). This way, you can take your time blocking with you, making it easy to stay on track no matter where you are. If you’re time blocking on a computer, bookmark your calendar in your browser to make it easy to access.
Turn on reminders. You can turn on Google Calendar notifications on both computers and mobile devices, which will send you alerts when you should be starting a task or prepping for an event.
Limitations of time blocking in Google Calendar
While time blocking in Google Calendar is an insanely effective productivity method, it does come with some challenges. Here are some things to be aware of if you’re getting started using Google Calendar for time blocking:
The biggest challenge you’ll run into is that once you create your schedule, you’ll find you have to follow it perfectly or it quickly falls apart. If you get even an hour behind, or your future plans change, you have to manually readjust all your time blocks.
Because this is tedious and demotivating, most people that run into this think time blocking isn’t for them and they go back to using just a to-do list. Don’t worry, it’s not just you. We’ve talked to hundreds of people who’ve tried time blocking, and this is a very common experience.
The way to overcome this is to automate your time blocks so that they will reschedule on their own whenever you get behind or plans change. This is commonly referred to as automatic time blocking, auto-scheduling, or AI scheduling.
How to set up Automatic Time Blocking in Google Calendar
You can create flexible time blocks that move around automatically as plans change by connecting your Google Calendar to an AI scheduling assistant like FlowSavvy. By creating auto-scheduled tasks in FlowSavvy and then syncing FlowSavvy to Google Calendar, your time blocks in Google Calendar will be automatically scheduled and rescheduled as necessary.
For example, when a new meeting is added in FlowSavvy, FlowSavvy instantly reoptimizes your calendar to make room:
FlowSavvy has the option to then sync these changes to Google Calendar, so you get flexible time blocking in Google Calendar.
To set up automatic time blocking in Google Calendar, follow these steps:
1. Create a free FlowSavvy account
FlowSavvy is the service we’ll use to automate the time blocks. Visit https://my.flowsavvy.app/app/signup to create your free account. Auto-scheduling in FlowSavvy is available on the Free plan, and syncing tasks back to Google Calendar is an optional addon that is available on the Pro plan.
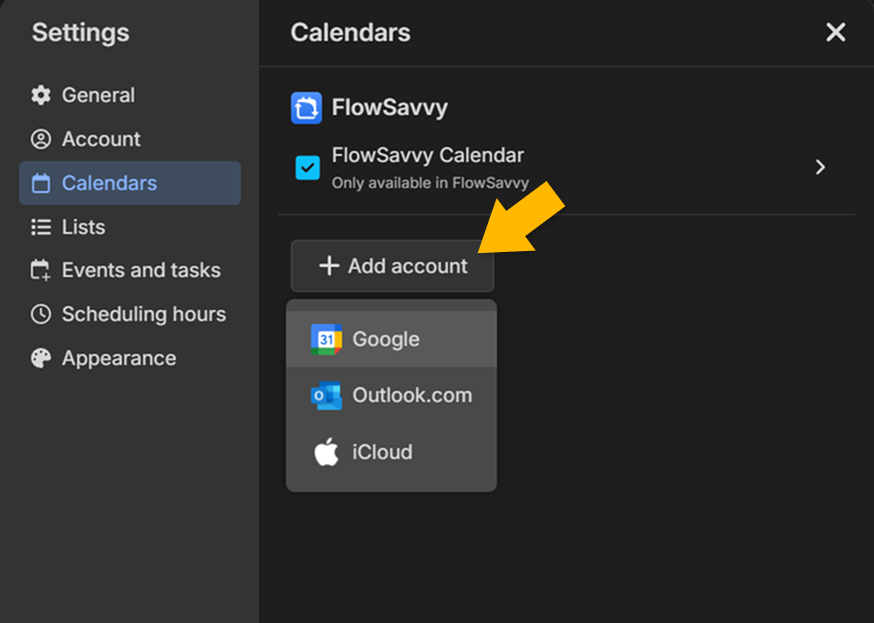
2. Connect your Google Calendar account
In Settings > Calendars, click “Add account”, then connect your Google Calendar account.
3. Sync your calendars to FlowSavvy
Select all of the calendars that you want FlowSavvy to consider when determining your availability. When you add auto-scheduled tasks later, FlowSavvy will make sure they’re scheduled around your existing events.
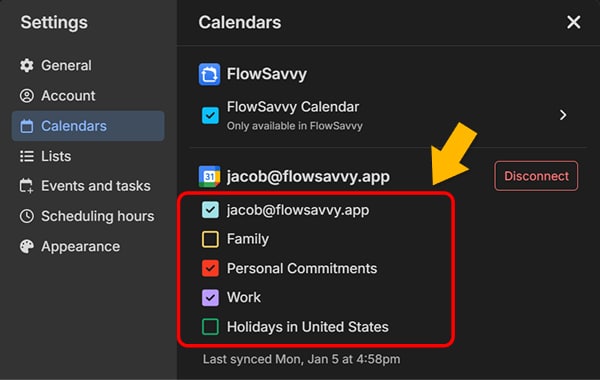
Don’t worry, FlowSavvy will never modify your events. FlowSavvy only moves “Auto-scheduled tasks” that you create in FlowSavvy.
4. (Optional) Choose which Google Calendar to sync tasks to
If you’d like your time-blocked tasks to show up in your Google Calendar, select the calendar your FlowSavvy tasks should be synced to. If you want to keep your auto-scheduled time blocks only in FlowSavvy, you can skip this option.
Note: Syncing FlowSavvy Tasks to Google Calendar is a Pro feature.
5. Create Auto-Scheduled Tasks
Set a duration and due date, and FlowSavvy will automatically find time for your task in your calendar.
Now that you’ve created these auto-scheduled tasks in FlowSavvy, your time blocks will automatically reschedule themselves if plans change or you get behind. This is a great way to get all the benefits of time blocking without having to constantly rearrange your time blocks.
Summary
Time blocking is a great way to be more intentional with your time, and Google Calendar is one of the simplest tools to quickly set up time blocking.
The main challenge of time blocking in Google Calendar is the need to constantly adjust your schedule when things don’t go as planned. To make time blocking more flexible, you can use FlowSavvy to automatically schedule and reschedule your tasks.


")
")

